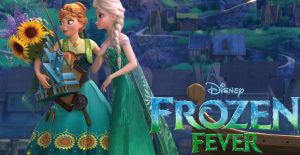
It all starts off with a little girl wanting a costume, a mommy wanting to sew and a pattern on sale. I like the less skimpy dresses for my 7.5 year old, especially when one is wearing them for Halloween plus it has all the spring flowers. I wanted to make this dress last a long time, be comfortable and washable. So it is made of cotton and embroidery floss.
Ok, I forgot to do photographic research before following the pattern and believing what colors to use. When I look at the movie again and the pics from the movie her corset is a nice dark blue NOT black. Here is a good website for picture reference. This bodice is made of a heavier weight cotton than the rest of the dress and lined.
Each piece is drawn onto iron on transfer and cut out. I hand stitched all the details, adding extra embroidery floss to add color and texture. For instance the center of the sunflowers has half rounds of darker brown.
When I was “done” for the school harvest festival I already wanted more than the pattern gave me. For instance the dress should have two more sections of sunflowers. Twenty in total, then they will be closer together. It should have pockets, bees, leaf petals by the pockets, and an embroidery bee “cowboy” stitch trail over each sunflower.
There were these fabulous spots all over the dress, the pattern wanted sequence. I wanted something that would last in the wash. I didn’t want to cut tiny circles out to sew on. The small ones are a basic french knot. But for the larger ones I found a tutorial for a simple Stem Stitch rose embroidery. It worked out great on the dress and vest. Some are larger than others. Here is the video I watched to teach myself. Its not in English, but it is close up and easy to follow.
The vest pattern was a mess. I started to place the tulips and I was disappointed at their directed placement over the movie. Follow the movie clip image below for placement, but the color is too bright. Add more “cowboy” stitch along with french knots, and stem stitch roses. The (color 351) embroidery leaves on the front I cut from fabric and covered with a fish bone stitch. The back was another sunflower from the dress and leaf designs from the pattern. However the Bees were hand drawn then filled in with floss. I lined it with an unused flannel receiving blanket and another layer of olive green cotton. Hopefully it keeps her a tad bit warmer.
The broach was impossible to find one similar on Etsy or Ebay. So again I decide to teach myself something I don’t know how to do. I bought molding clay and watched a few videos on making flower canes. Lightly press the pin back and gem into place remove both and bake. Then use heavy duty glue to attach the pin back and gem. Invest in the slicing blade, kitchen knives aren’t going to give you a clean cut. I bought metallic gold, color yellow gold, and black. The yellow is much softer and warms up faster than the others.
For hair my kiddo has very little so I added several hair extensions. I first added a clip in weave to have length. I also purchased a kid size adjustable haring bone braid headband. This video from the coronation is my favorite tutorial. This image is from the Frozen Fever hair styles book. Don’t forget you need the Lime green tights!
The Disney Store has a new sunflower hair accessory available. But if you want to make it yourself try this website.
If you don’t have the time and you are looking for an adult costume these are nice. Anna or Elsa. I can’t vouch for either of them, but they look great.
